Do you own a Philips Home Theater System Radio, but struggle with programming it? Fear not, for we have compiled a comprehensive guide to help you program your device with ease. This step-by-step guide will delve into the basics of understanding your Philips Home Theater System Radio, setting it up, connecting it to your TV, and program it using the remote or manually.
Understanding Philips Home Theater System Radio
Before we dive into programming your Philips Home Theater System Radio, it is essential to understand its basic features. This device is a Bluetooth-enabled 5.1 home theater system that allows wireless streaming from mobile devices and PCs. The system supports Dolby Digital 5.1, Dolby Digital Plus, and DTS sound formats. The radio tuner comes with an RDS feature (Radio Data System), which enables broadcasting of advanced information such as the radio station’s name, song title, and artist.
In addition to its basic features, the Philips Home Theater System Radio also comes with a USB port that allows you to play music directly from a USB drive. The device also has an HDMI output, which enables you to connect it to your TV for a more immersive viewing experience. The system’s remote control is user-friendly and allows you to adjust the volume, bass, treble, and other settings with ease. With its sleek design and powerful sound, the Philips Home Theater System Radio is an excellent addition to any home entertainment setup.
Setting up your Philips Home Theater System Radio
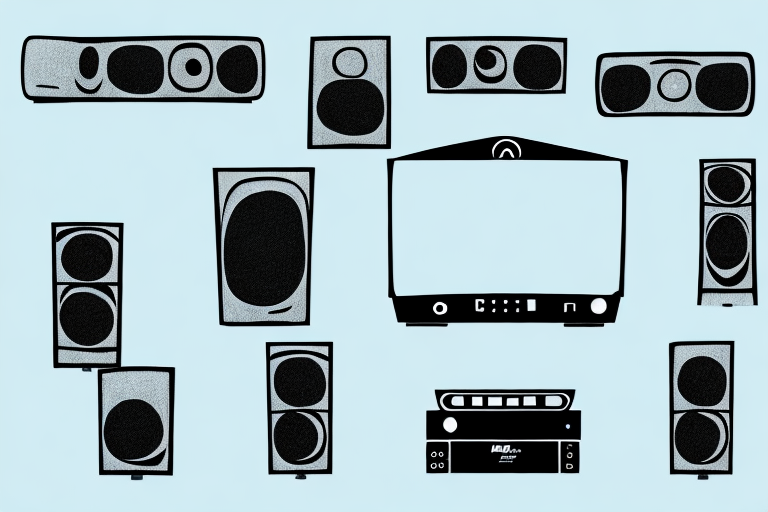
The first step to programming your Philips Home Theater System Radio is setting it up. Start by unpacking the device and identifying its components. The box should contain the main system unit, a remote control, two front speakers, two surround speakers, a central speaker, and a subwoofer. Connect each speaker to the system using the supplied speaker wires.
Place the speakers strategically in your room setup. The front speakers should be located on either side of your TV, while the rear speakers should be behind your sitting area. The central speaker goes in the center of your TV, while the subwoofer can be placed anywhere in the room.
Once you correctly connect the components, plug in your device’s power cord to the socket and connect your device to your TV using an HDMI or digital audio cable.
After connecting your device to your TV, turn on your Philips Home Theater System Radio and follow the on-screen instructions to complete the setup process. You can also customize the settings to suit your preferences, such as adjusting the volume, bass, and treble levels.
Additionally, your Philips Home Theater System Radio may come with built-in Bluetooth connectivity, allowing you to stream music wirelessly from your smartphone or tablet. To connect your device, simply enable Bluetooth on both your Philips Home Theater System Radio and your smartphone or tablet, and pair the two devices.
Connecting Philips Home Theater System Radio to your TV
The next step is connecting your Philips Home Theater System Radio to your TV. The most common way to connect your device to your TV is using an HDMI cable. This cable transfers both audio and visual data, giving you high-quality sound and video.
If your TV does not have an HDMI port, you can use a digital audio cable to connect your device to your TV’s audio output port. Whichever method you use, refer to your device’s user manual for specific guidance on how to connect the device.
It is important to note that some Philips Home Theater System Radios may also have wireless connectivity options, such as Bluetooth or Wi-Fi. These options allow you to connect your device to your TV without the need for any cables. However, it is important to ensure that both your device and TV support the same wireless connectivity options before attempting to connect them.
How to program Philips Home Theater System Radio using remote
Using your remote, navigate to the programming section in the device’s settings menu. Typically, this section is situated under the ‘Tuner’ category. Once there, select the language, using the right or left arrow keys and confirm your selection by pressing the enter button.
The next step is selecting your area’s preset radio frequencies. Press the ‘Auto Program’ button on your remote, and the device automatically scans and selects the available stations in your area.
You can opt to add or delete a specific frequency manually. To do this, tune into the station you want to add. Press and hold the numerical button on the remote corresponding to the frequency slot you want to save it in for three seconds. Delete a programmed radio station by pressing the numerical button for the slot you want to clear.
It is important to note that if you are having trouble receiving certain radio stations, you may need to adjust the antenna on your Philips Home Theater System. The antenna can be adjusted by moving it around or extending it to improve reception. Additionally, if you are still having trouble receiving certain stations, you may need to consider purchasing an external antenna to improve the signal strength.
Step-by-step guide to programming Philips Home Theater System Radio manually
If you prefer manual programming, start by selecting the ‘Manual Program’ button under the ‘Tuner’ category in the device’s settings menu. Using the up and down arrow keys, navigate to the frequency you want to add and tune into it using the ‘Tune’ knob.
Press and hold the numerical button for three seconds that corresponds to the frequency slot you want to save it in. Repeat the above-stated process to add other stations. Remember, you can delete any frequency by pressing the numerical button for that slot for three seconds.
It is important to note that the Philips Home Theater System Radio has a limited number of frequency slots available for manual programming. Therefore, it is recommended to only add your favorite stations to avoid running out of slots.
Additionally, if you experience any difficulties with manual programming, you can always use the device’s automatic programming feature. This feature scans for available stations and saves them to the available frequency slots.
Troubleshooting common issues while programming Philips Home Theater System Radio
If you encounter issues while programming your Philips Home Theater System Radio, don’t panic. In most cases, the device may fail to program a station due to a weak signal. Try repositioning the antenna or relocating the device to a better reception area.
Another common issue is interference from other electronic devices such as a phone or Wi-Fi router. Try moving the device away from such devices to eliminate interference.
If the above solutions do not work, you can try resetting the device to its factory settings. This can be done by accessing the settings menu and selecting the option to reset the device. Keep in mind that this will erase all previously programmed stations and settings, so make sure to have them written down or saved before resetting.
Tips and tricks to enhance your listening experience with Philips Home Theater System Radio
To enhance your listening experience, you can adjust the device’s equalizer settings to fit personal preferences. You can also customize the sound settings to match different music genres or applications. Consider pairing the device with a wireless subwoofer to get a more immersive experience while watching movies or listening to music.
Another way to enhance your listening experience with Philips Home Theater System Radio is to use the device’s built-in Bluetooth connectivity to stream music from your smartphone or tablet. This allows you to access a wider range of music and audio content, and you can control playback directly from your mobile device. Additionally, you can connect the device to your TV or gaming console to enjoy a more cinematic audio experience while watching movies or playing games.
Top features of the Philips Home Theater System Radio
The Philips Home Theater System Radio comes equipped with various features that make it stand out from the competition. Some of its top features include:
- Dolby Digital 5.1, Dolby Digital Plus, and DTS sound formats for high-quality sound
- Bluetooth-enabled 5.1 home theater system that allows wireless streaming from mobile devices and PCs
- RDS feature that enables broadcasting of advanced information such as the radio station’s name, song title, and artist
- Multiple connectivity options including HDMI and digital audio cable
- An intuitive remote control for easy programming and navigation
In addition to these top features, the Philips Home Theater System Radio also boasts a sleek and modern design that will complement any home entertainment setup. Its compact size makes it easy to fit into any space, while its black finish gives it a sophisticated look.
Furthermore, the Philips Home Theater System Radio is incredibly user-friendly, with a simple setup process that allows you to start enjoying your favorite music and movies in no time. Its intuitive interface and easy-to-use controls make it a great choice for anyone who wants a high-quality home theater system without the hassle of complicated setup and programming.
Frequently asked questions about programming Philips Home Theater System Radio
Here are some frequently asked questions about programming Philips Home Theater System Radio:
- Q: Can I program the device manually?
- A: Yes, you can program the device manually.
- Q: How do I troubleshoot common programming issues?
- A: Try repositioning the antenna, relocating the device to a better reception area, or moving it away from other electronic devices that may cause interference.
- Q: Can I customize the device’s sound settings?
- A: Yes, you can customize the device’s sound settings to match your personal preferences or the application in use.
With this comprehensive guide, programming your Philips Home Theater System Radio should be a breeze. Take advantage of the device’s advanced features, and enjoy high-quality sound for movie nights or music listening sessions.
Additionally, it is important to note that the Philips Home Theater System Radio comes with a user manual that provides detailed instructions on how to program the device. The manual also includes troubleshooting tips and information on how to optimize the device’s performance. It is recommended that you refer to the manual for any programming or technical issues that may arise.