Welcome to our comprehensive guide on how to install a home theater sound system. In this article, we’ll walk you through everything you need to know about setting up your own home theater audio system, from understanding the components to choosing the right speakers and amplifiers, and troubleshooting common issues. So, let’s get started!
Understanding the Components of a Home Theater Sound System
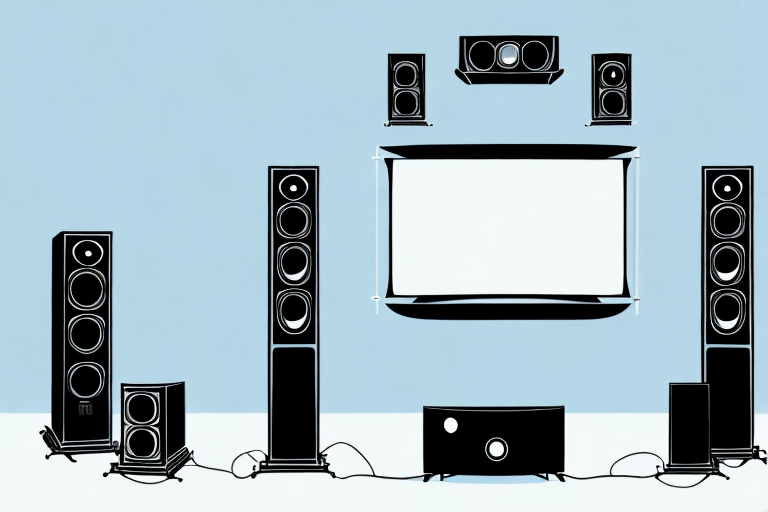
Before you begin your installation, it’s important to understand the basic components that make up a home theater sound system. There are typically five main components to a home theater audio setup: an audio receiver, an amplifier, a set of speakers, a subwoofer, and audio cables. These components work together to produce high-quality audio for your home theater.
The audio receiver is the central hub of your home theater sound system. It receives audio signals from your various input devices, such as your TV, Blu-ray player, or gaming console, and distributes them to the other components of your system. The amplifier then takes these signals and amplifies them to a level that can power your speakers and subwoofer.
The set of speakers is what delivers the audio to your ears. There are typically two front speakers, a center speaker, two rear speakers, and a subwoofer. The front speakers are responsible for delivering the majority of the audio, while the center speaker is responsible for dialogue and other center-channel audio. The rear speakers provide surround sound effects, and the subwoofer delivers deep, low-frequency bass.
Choosing the Right Home Theater Sound System for Your Space
When choosing a home theater sound system, it’s important to consider the size and layout of your room, as well as your personal preferences for sound quality and volume. A good rule of thumb is to select high-quality components that match the size of your room and your budget.
Another important factor to consider when choosing a home theater sound system is the type of content you will be watching or listening to. If you primarily watch movies with explosive action scenes, you may want to prioritize a system with a powerful subwoofer to enhance the low-frequency effects. On the other hand, if you listen to a lot of music, you may want to focus on a system with high-quality speakers that can accurately reproduce a wide range of frequencies.
Essential Tools and Materials for Installation
To install your home theater sound system, you’ll need a few basic tools and materials, including power tools, a measuring tape, speaker wire, and cable ties. You’ll also need a clear understanding of the layout and electrical wiring of your room.
Additionally, it’s important to have a level and a stud finder to ensure that your speakers are mounted securely and evenly on the wall. If you plan on running wires through the walls, you’ll need a fish tape or wire snake to guide the wires through the insulation. It’s also a good idea to have a surge protector to protect your equipment from power surges and electrical damage.
Preparing Your Space for Installation
Before beginning the installation process, it’s essential to clear and prepare your space. Remove any obstructions or furniture that may interfere with the installation or sound quality, and ensure that your wiring is in order.
Additionally, it’s important to consider the acoustics of your space. If you have hard surfaces such as tile or hardwood floors, you may want to add area rugs or curtains to help absorb sound and prevent echoes. If your space is particularly large or has high ceilings, you may also want to consider adding acoustic panels to improve sound quality. Taking these steps can greatly enhance your listening experience and ensure that your new installation sounds its best.
Installing the Audio Receiver and Amplifier
Begin by installing your audio receiver and amplifier. These components will form the central hub of your home theater sound system and are vital for controlling the overall sound quality and volume. Follow the manufacturer’s instructions for mounting and wiring these devices, and pay careful attention to the connections and wire routing to ensure optimal sound quality and safety.
It is important to note that the location of your audio receiver and amplifier can also affect the sound quality of your home theater system. Avoid placing them in enclosed spaces or near other electronic devices that may cause interference. Additionally, make sure the area around the components is well-ventilated to prevent overheating. Taking these precautions will ensure that you get the best possible sound experience from your home theater system.
Connecting the Speakers to the Audio Receiver
Next, it’s time to connect your speakers to the audio receiver. Depending on the type and number of speakers you’ve chosen, this may involve different types of wiring and connection techniques. Be sure to follow the manufacturer’s instructions carefully and test each connection before moving on to the next component.
It’s important to note that the placement of your speakers can greatly affect the overall sound quality of your audio system. Consider the size and shape of your room, as well as the intended use of the system, when deciding where to place your speakers. Experiment with different positions and angles to find the optimal setup for your listening experience.
Positioning and Mounting Your Speakers
Once you’ve connected your speakers, you need to carefully position and mount them in your home theater space. The exact positioning of your speakers will depend on the layout of your room and your personal sound preferences. Experiment with different positioning techniques to find the optimal sound quality for your space.
It’s important to note that the type of speaker mount you choose can also impact the sound quality. Wall mounts, floor stands, and ceiling mounts all have different effects on the sound dispersion and resonance of your speakers. Consider consulting with a professional or doing research to determine which type of mount is best for your specific speakers and room layout.
Adjusting Audio Settings for Optimal Sound Quality
With all the components in place, it’s time to adjust your audio settings for optimal sound quality. This may involve adjusting the equalizer and balancing the levels of your speakers to ensure that the sound is well-distributed and clear throughout your room.
One important factor to consider when adjusting your audio settings is the acoustics of your room. The size and shape of your room, as well as the materials used in its construction, can greatly affect the sound quality. You may need to experiment with different speaker placements and settings to find the best sound for your space.
Another consideration is the type of audio you will be listening to. Different genres of music and types of media may require different settings to achieve optimal sound quality. For example, a bass-heavy song may require adjustments to the low-frequency settings, while a dialogue-heavy movie may require adjustments to the mid-range frequencies to ensure clear speech.
Troubleshooting Common Installation Issues
Despite careful planning and installation, you may encounter some common issues with your home theater sound system, such as static, humming or distortion. Most of these issues can be resolved through careful testing and adjustment of your components. Refer to your user manual or contact the manufacturer for specific guidance.
One common issue that may arise is the lack of sound from one or more speakers. This can be caused by a loose connection or a faulty speaker. Check all connections and try swapping out the speaker with a known working one to isolate the issue. If the problem persists, contact the manufacturer for further assistance.
Another issue that may occur is the audio being out of sync with the video. This can be caused by a delay in the signal processing or a mismatch between the audio and video settings. Check your settings and adjust as necessary. If the problem persists, try resetting your system to its default settings or contact the manufacturer for further assistance.
Enhancing Your Home Theater Sound System with Accessories
Finally, you can enhance your home theater sound system with accessories such as soundbars, subwoofers, and acoustic panels. These accessories can help to create a more immersive and realistic audio experience within your space.
A soundbar is a great addition to your home theater system as it can provide a wider soundstage and clearer dialogue. It is a long, slim speaker that can be mounted on the wall or placed on a shelf below your TV. Some soundbars also come with a subwoofer to enhance the bass and provide a more dynamic sound.
If you want to take your home theater sound system to the next level, consider adding a subwoofer. A subwoofer is a speaker that is designed to reproduce low-frequency sounds such as explosions, thunder, and music bass. It can add depth and impact to your audio experience, making it feel more realistic and immersive.
Maintenance Tips to Keep Your Home Theater Sound System in Top Condition
Proper maintenance of your home theater sound system is essential for ensuring optimal performance and longevity. This may include regular cleaning and inspection, as well as careful use and storage of your components.
There you have it, a comprehensive guide on how to install your own home theater sound system. By understanding the components of your system, choosing the right equipment, carefully installing your devices, and adjusting your settings, you can create a high-quality, immersive audio experience that will take your home theater to the next level.
It is also important to keep your system up-to-date with the latest software and firmware updates. These updates can improve performance, fix bugs, and add new features to your system. Check the manufacturer’s website regularly for updates and follow their instructions for installing them.